Posted on 5 Comments

JP Freefoil vs Hydrofoil boards

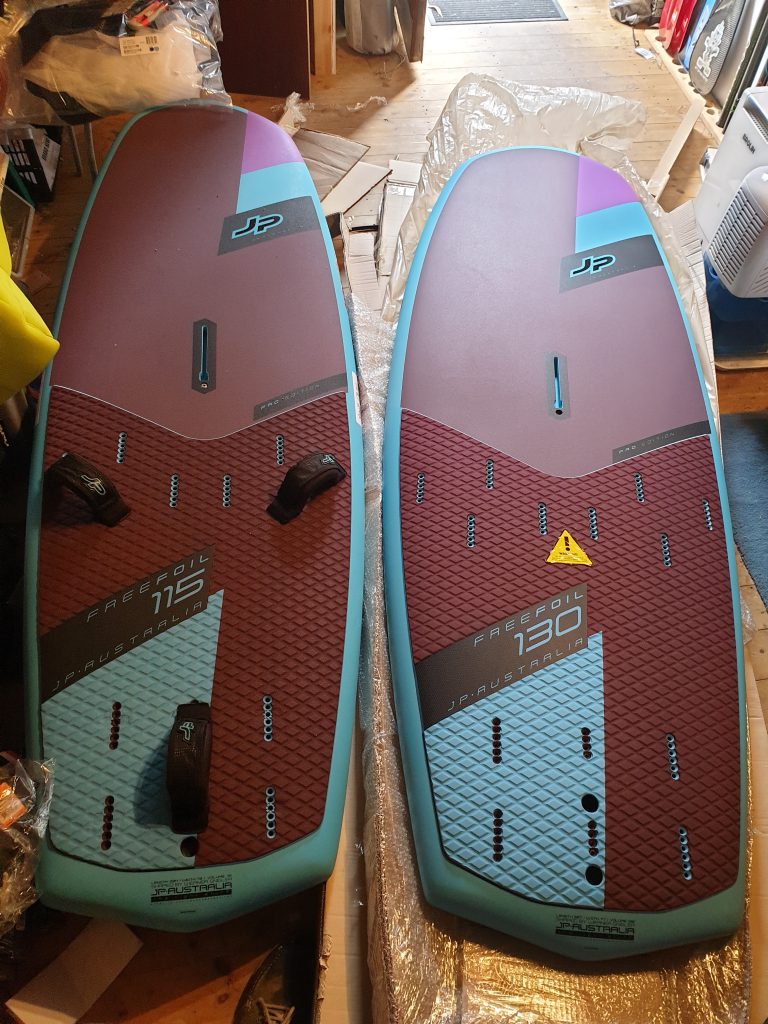
With JP having two ranges of dedicated wind foil boards some people may wonder which to range to go for. The 130 freefoil has a similar width and length to the 120 Hydrofoil and the 115 freefoil has the same length and width as the now discontinued hydrofoil 105. This comparison is drawn on the 105 hydrofoil vs the 115 freefoil.

First impressions- While the boards have similar widths and lengths the outlines are quite different with the hydrofoil boards having much wider tails and the volume placement further aft to match. Like for like the freefoil boards are a bit heavier due to the additional foil tracks. The deck shape on the freefoil is an average domed shape and lacks the concave around the mast foot as seen on the hydrofoil boards. The hydrofoil boards feature bevels on the underside to prevent sticking on touch down while the freefoil utilises rail shape to do the same job. The freefoil has more footstrap positions and includes the option of a single back strap. The mast track is further back on the freefoil boards. 

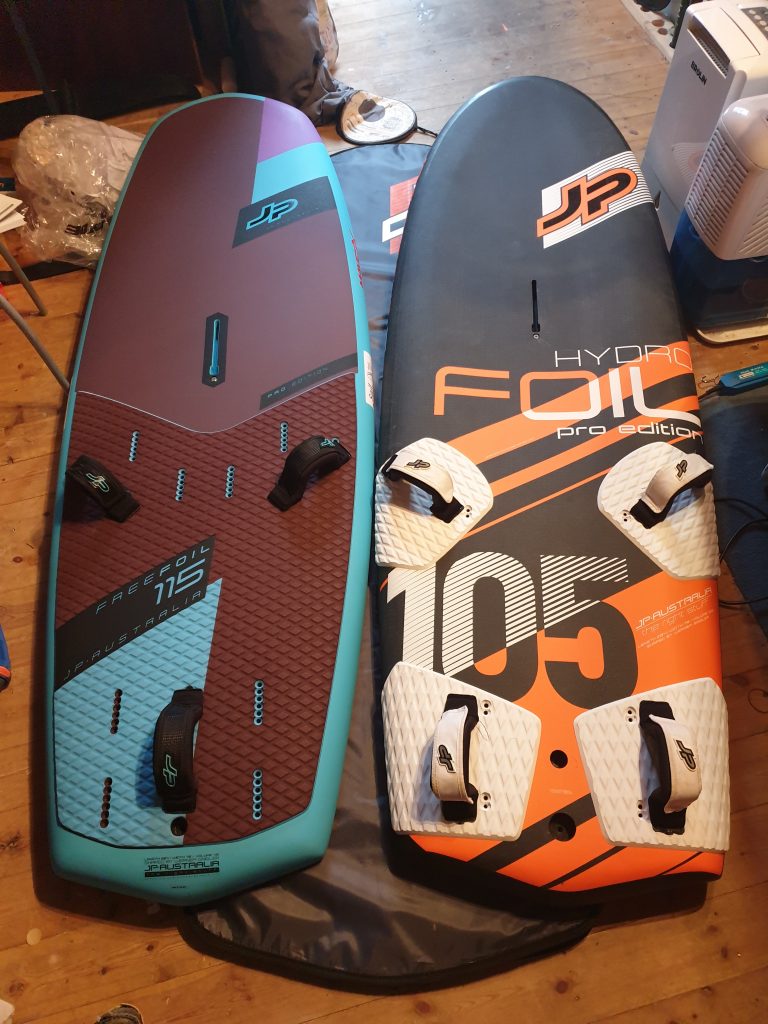
On the water – Straight away you notice the difference in the volume distribution between the two boards. The hydrofoil has all the volume at the back of the board and on the small 105 version it is a brave person who risks putting a foot in front of the mast foot. On the freefoil the volume is much more centered and the board is easier to uphaul and a conventional uphaul stance can be used. 

Getting flying – I am used to using dedicated foil boards so I naturally move back on the boards and get my front foot in the strap and then slide my back foot back as I pump. This technique works well on the hydrofoil but if I move back too early on the freefoil it tends to drag its tail a bit. This would be less of an issue for lighter riders (I am 95kg). This is where a lower aspect early lifting foil would also help. Don’t get me wrong the freefoil will fly early but not quite as early as the hydrofoil boards. Both boards are capable performers on the hydrofoil in a given wind you might use a 6.0 and a high aspect foil while in the same wind a 5.5 sail and lower aspect foil would probably be ideal. 

In flight – Both boards ranges provide comfortable flights. On the freefoil you are standing closer to the rig than on the hydrofoil. You can therefore distance yourself from the rig a bit easier on the hydrofoil and therefore take more rig power, so on the freefoil you may change down sails a bit earlier. The single back strap option of the freefoil board appealed to me but in the end I preferred the double back straps. 

Gybeing – While both ranges gybe well I actually preferred the hydrofoil boards for gybeing for two reasons, firstly the wider tail area gives you more working deck space to stumble about on mid gybe and secondly the additional foil tracks do add extra weight that at times I could feel pulling the board down  mid gybe

Overall – There is no better or worse board here, both boards do what they claim. If you want to go fast on a foil then the hydrofoil boards have a definite edge. But for versatility the freefoil boards can take a wider range of foils and also offer the option of using a wing rather than a sail although you would need an additional foil to be able to do both sports. 

Which is easier as a first foil board? If you are coming from a wave sailing background then you will feel more at home on the freefoil but if you are used to freerace or slalom boards then the hydrofoil would probably suit you best. 

JP Australia
Posted on 15 Comments

Making a sail

A few people have suggested I should create a website on “how to make a sail”. This has as far as I know never been done before so why not? There are books and web sites devoted to making boards but not sails. Windsurfing sail makers like to keep their ideas to themselves. Sail makers are often afraid of adverse comment which could come from their peers if they were to go public with their design ethos and if I was responsible for making a large number of sails I would probably keep it all to myself as well.There are two elements to making a sail, its design and physically constructing a sail. Sail design could be a book in itself so I am not going to go into any depth on sail design but rather give general guidance which will be high lighted in red. Here we are making a one off “prototype” sail, at this scale there is comparatively little emphasis placed on efficiencies of production or brand image (graphics).OK, you want to make a sail, save a bit of money and your mum has a sewing machine. The trouble with sails is they are big flat things and you need a fair bit of space to make one. You will need a area large enough to lay a sail out and be able to walk around it which means about 6 meters by 3 meters. As regards sewing the sail you either need to take it to someone who can sew it for you or you are going to have to get a industrial sewing machine. Industrial sewing machines are quite big things (very heavy). The machine needs to be able to do a zig zag stitch and handle V69 thread. There is no point having a working area on the floor and your sewing machine up at table height. You need to construct a table level with the machine that is big enough to support the sail (think double table tennis table size). 4 sheets of ply and a few length of CLS timber should do it.
Getting started.I am going to assume you have a sewing machine and a large table level with the machine. Your table is you “blank canvas” for your sail design.Firstly you want to draw the outline of the sail you want to make. At this point you need to decide what size the sail is going to be and its boom and mast dimensions. High aspect (short boom tall mast) of low aspect (longer boom, shorter mast). Generally longer booms will get you planning earlier whilst shorter boom are more manoeuvrable. Have a look at the dimensions of similar sails, don’t fool yourself that you can fit a 9 meter sail on a 2 meter boom. You want to have a mental picture of what you want the sail to be like. I normally picture a particular days sailing that I want to use the sail for. It helps if you develop some reference points to guide you. Draw pencil lines around your existing sails using the tack and the luff sleeve up to the boom opening as a common reference points. This way you are using your existing sails as the prototypes to the sail you are going to make.At this stage you are going to have to draw the curve at the front of the sail (luff curve) and this is the most important part of the whole sail. Get it about right and whatever else you do the sail will be OK, get it wrong and even if the rest of the sail is perfect you will have a dog of a sail. It is how the curve at the front of the sail relates to your mast when it is bent with downhill / out haul that will determine the whole nature of the sail. In the diagram below we have 2 masts mast A with a even bend curve and mast B with a flexy tip. THE LUFF CURVE ON THE SAIL DOES NOT MATCH THE CURVE OF THE MAST. If anything the luff curve is almost a upside down curve the mast takes. The curve in the top third of the sail should be very slight and yet down near the boom the luff curve may be greater than the bend in the mast and that’s what produces the rotation or battens sitting to the side of the mast. The greater the difference at the head of the sail between the bend of the mast and the sails straighter luff curve the greater the pre twist will be in the leech (the more floppy the head will be). Sail designers tend to sit in specific camps on what the perfect luff curve should be like, in one camp you have Ezzy and North wave sails with very little rotation and then there is Neil Pryde ,Tushingham, Naish etc. with their well rotated sails. How much should the luff curve away from the straight head to tack line? 25 cm may be a reasonable staring point on a 430 luff, more for bigger sails , less for smaller. If you compare the curve with your existing sails they will mislead you, any shape in the body of the sail will put more apparent luff curve into the sail when you lie it flat. For a example of altering a luff curve to suit a different mast click here .
With reference to the clew hights of your existing sails you should be able to establish your perfect clew height. Once you have drawn a rough outline of the sail the next thing is to draw on the battens. More battens = more stability and better top end, less battens = lighter weight and improved manoeuvrability. Decide whether the lines you are drawing on if the middle, top or bottom of the batten pocket, I always draw the bottom of the pocket.So now we have a sail outline with battens, the final part of out 2 dimensional design is to draw the panels on. There are a number of reasons for the seams on a sail, they allow a change to a more appropriate type of cloth for that region of the sail i.e.. Heavier materials in the foot of the sail. Seams also allow us to put shaping into the body of the forming a 3 dimensional foil. We will come to how to do seam shaping later. Nearly all modern sails have hidden seams under every batten pocket. This allows for accurate seam shaping but also helps with cloth efficiency. Big panels waste big bits of material between then when they are cut from a roll of cloth, the smaller the panels the less waste. This isn’t really much of a issue when making your own sail and I would advise you to keep the number of seams to a minimum. Seams also allow for colour changes and “brand identity” again not a concern at this point.Below is a picture of my design table, you can see the clew positions of my 4 wave sails and you can see how the sails are scaled, I like about a 10 cm difference in my boom length when changing sails.Over to the left you can see the lines for the foot panel seems.
OK we should now have a full scale line drawing of the sail we want to make. We have the outline, the battens and some seems. Its all very good so far but its very 2 dimensional. How do we make it 3 dimensional? – luff curve and seem shaping.Most of today’s sails are fairly flat especially in the top half of the sail. But why do some battens rig completely flat while others, especially the foot batten have quite a bit of fulness in it. The answer is that the foot batten and most likely the batten above the boom have seams running under the batten pockets. These seams have shaping in them. When you join two pieces of cloth if the edge of both panels are straight the seam will be just a flat joint of the materials. To put shape into the seam we attach a curved edge to a straight edges. Bellow is a sketch of what happens and you can try this by sticking a couple of sheets of paper together. Once you have stuck the curved edge to the straight one the cloth will never lie flat.For ease of shapeing aim to put a seam under at least the foot batten and the batten above the boom.Design note: making a good sail relies on using the correct blend of a number to criteria. For example very full sails and lots of batten rotation do not tend to work well together.
OK. We have a line drawing of our sail with lines drawn on for the battens and seams. We are now ready to start cutting some cloth. You want to start with a central panel, lets say a main window panel. Roll the cloth out over the drawing of the panel and then draw the edges of the panel. Don’t cut anything out yet. The lines are one edge of you seams. When you cut out the panel next to it the edges will but up together. On one of the edges you will need to add the double sided adhesive tape to the out side of the panel. (Nearly everything on the sail is stuck before it is sewn) Below you can see the dashed seam line drawn on the table with the adjoining panels pulled back slightly so that you can see it. I have added the double sided tape to the top xply panel. You can then use the edge of the double sided tape as a cutting guide. You can now cut the panel out next to it.
When you come to a seam the you want to have some shape in it draw the straight lines as before but now you are going to add a second curved (convex) line. The maximum draft (fullness) of the seam will be where the curved line is furthest from your straight (base) line. So you actually want the maximum curvature on the line to be 25 to 35 % back from the luff just like the curve you would expect from a batten. How much shape? A foot batten seam for example might have 10 mm over a 1.5 meter length.Below is a foot batten seam before its stuck together. Note that it is one foot panel going onto three or four other panels. In cases like this it is better to leave the panels a bit over size and then trim them all in one go one the are glued together. Before you stitch any seam on monofilm or xply you must stitch insignia tape to both sides of the seam to reinforce the materials.
Carry on with the other panels. Leave the external edges of the sail with a bit of surplus cloth as its easiest to trim the sail once it has all it panels together and sewn.Below are the panels to a 5.5 wave sail. The sail is not very conventional as it doesn’t have the horizontal shaping seam under the batten above the boom (it has shape on the vertical luff seam instead). It also has overlapping panels at the clew.
Stick and sew two panels at a time until the sail is all in one piece. You can now trim it to your design on the table and draw on the batten pockets.As below we now have something resembling a sail.
Where you have horizontal seams and you are going to reinforce them with insignia tape you may as well kill two birds with one stone by using 50 mm wide insignia tape which you will use under each batten pocket the crosses monofilm or Xply as per the picture below.
You can now start adding the 2 ply. Note every where that you sew xply or monofilm it must be reinforce with insignia tape or have a layer of cloth glued on each side (as per the edges of the corner patches. You can see below I have used black insignia tape, I have also added white insignia patches to take two small battens on the upper leech.
Below you can see the different layers of xply building up to a well reinforced clew. The bit of monofilm under the sail with all the stitching on it is just a scrap bit of material used to set up the thread tensions on the machine and has nothing to do with the sail.
Below the outer patches are being added. You want the patches to be a composite of layers of something like heavy monofilm to resist stretching and layers of a woven material (sailcloth) to give rip strength.
Next we put the 50 mm wide insignia tape where the batten pockets go and also the batten pocket material on the back of the sail to prevent scuffing (optional). Once you have that on you can fold some sailcloth tape and sew it down the leach and along the foot. This is the only part of my sails that isn’t glued on prior to sewing.
Next is the webbing along the foot. Then the batten pockets. I add a additional layer of monofilm in the batten pockets due to the high stretching force applied with the batten tensioners. How you finish the pockets off depends on the tensioners you are using. Once the batten pockets are on you can tape the luff. On some sails this is done before the batten pockets go on. Then you need to make fronts for the batten pockets which are normally a couple of layers of sailcloth and monofilm.
That really just leaves the sleeve. Take measurements on the width required from a existing sail and adjust as you see fit. Mast sleeves can be made from one or a number of pieces. The head of the sleeve will need reinforcing to take the down haul strain onto the mast tip. I would advise you make a adjustable head on you first few sails. Measure the sleeve and stick and sew it on only down to the foot batten. Then you can make a pad for the sleeve and finish it off. For eyes you can take the sail to a sail maker for them to press the eyes or you can steel some take pulleys of some old sails.Below is the first rigging of the sail. Remember there are no printed dimensions on the sail so you must know what shape you are looking for and rig it till it looks right. The things to look for are draft (fullness) flat at the top fuller below the boom. If you are wanting batten rotation you want to see the sleeve progressively twist. Pre twist – a personal thing, but is it as you wanted it?
Below shows a good view of the batten rotation, pre twist and sail draft.
Another view of the pre twist.
And now for the completed sail.
OK we have made a sail but there are some things you need to think about before you rush to get your sewing machine out.How much does it all cost? You can get a second hand sewing machine in the UK for about £350 upwards. The material cost drops greatly after the first sail or two. Budget on nearly £200 for you first sail and the £150 there after.Where do I get the battens from? You can buy new battens for £10 to £20 each, you are better off buying a written off sail for £30 and you can use all the battens and tensioners.What material do I need? You can use Monofilm (cheapest option) but I would advise a more robust material for the foot and luff. You will need monofilm for the reinforcement and maybe some xply for the foot etc. (you can use all xply if you wish). There are some good materials out there such as the Pentex tafita scrim laminate (the white cloth in the pictures) but they cost four time the cost of xply. You also need the double sided tape, insignia tape, 50 mm sailcloth tape (for batten pockets and edging). Sleeve cloth and some webbing.Just how accurate does everything have to be? You should notice about 2 mm difference in seam shaping , 5 mm in the luff curve. I use long fibreglass battens for drawing lines. You can use the edge of a roll of monofilm as a straight edge.Do I need to heat seal any thing? Yes the sleeve cloth and standard polyester sail cloth will need heat sealing, you can use a soldering iron for this.How does this method of making a sail differ to how the large international lofts make sail? The sails will be cut via computerised template the cloth will be cut maybe up to 20 layers thick at a time. The bits are stuck together and machined together. Economies of scale are quite great and the cost for them making a sail is a fraction the amount it will cost you.
Phew. Finished, when I thought of doing this web page I didn’t realise how much I would have to say just to explain the basic process. Apologies to anyone with a dial up connection.JohnLatest project – Soft Wave sailsI am currently working one some soft waves sails. By combining the highly manoeuvrable handling that comes with soft sails in conjunction with a modern twist profile and high tech materials the aim is to take wave sails a step forward.
Viewed from the head showing the draft.
The whole sail which also features a prototype draft lock system.
The above article is quite a few years old but here is a sail made during covid lockdown.
7.0 foil sail